Uploading Edge SWG Access Logs to Cloud SWG Hosted Reporting: Two Deployment Scenarios
When integrating Symantec/Broadcom Edge SWG (formerly ProxySG) with Cloud SWG Hosted Reporting, there are two supported approaches:
- Scenario A: Upload logs directly from Edge SWG to Cloud SWG via SCP.
- Scenario B: Deliver logs to a staging server (e.g., Ubuntu) first, then forward them to Cloud SWG.
This article describes both methods, common pitfalls, and how to verify that your logs are visible in Hosted Reporting.
Architecture Overview
Scenario A (Direct)                  Scenario B (Via Staging)

+-------------+                      +-------------+
|  Edge SWG   |                      |  Edge SWG   |
|             |                      |             |
|  Access     |                      |  Access     |
|  Logs       |                      |  Logs       |
+------+------+                      +------+------+
       | SCP (SSH)                          | SCP (SSH)
       v                                    v
+-------------+                      +-------------+
| Cloud SWG   |                      |  Ubuntu     |
| Hosted      |                      |  Staging    |
| Reporting   |                      |  Server     |
+-------------+                      +------+------+
                                            | SCP (SSH)
                                            v
                                     +-------------+
                                     | Cloud SWG   |
                                     | Hosted      |
                                     | Reporting   |
                                     +-------------+
Scenario A: Direct Upload from Edge SWG to Cloud SWG
Step 1. Prepare in the Cloud SWG Portal
- Enable Hosted Reporting.
- Generate and download the SCP client private key (PEM format).
- Note the username (
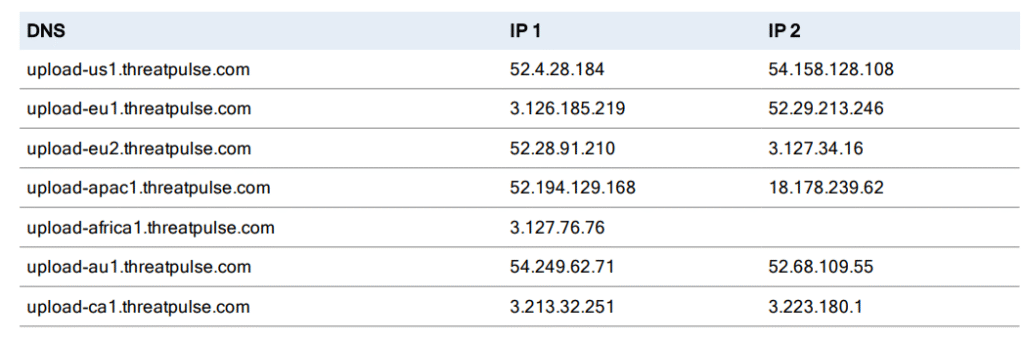
customerXXXXX). - Find a upload server (e.g.,
upload-apac1.threatpulse.com)- You can configure the server as
upload-<region>.threatpulse.com(for exampleupload-apac1.threatpulse.com). - Alternatively, you may use
nslookupto resolve the hostname and input the corresponding IP address.
- You can configure the server as
See the official documentation for the latest list of hostnames and IPs.
Step 2. Import the Private Key on Edge SWG
conf t
ssh-client
  client-keys
    inline rsa my_eof_marker
-----BEGIN RSA PRIVATE KEY-----
(paste the full key here)
-----END RSA PRIVATE KEY-----
my_eof_marker
exit
Verify with:
show ssh-client client-keys
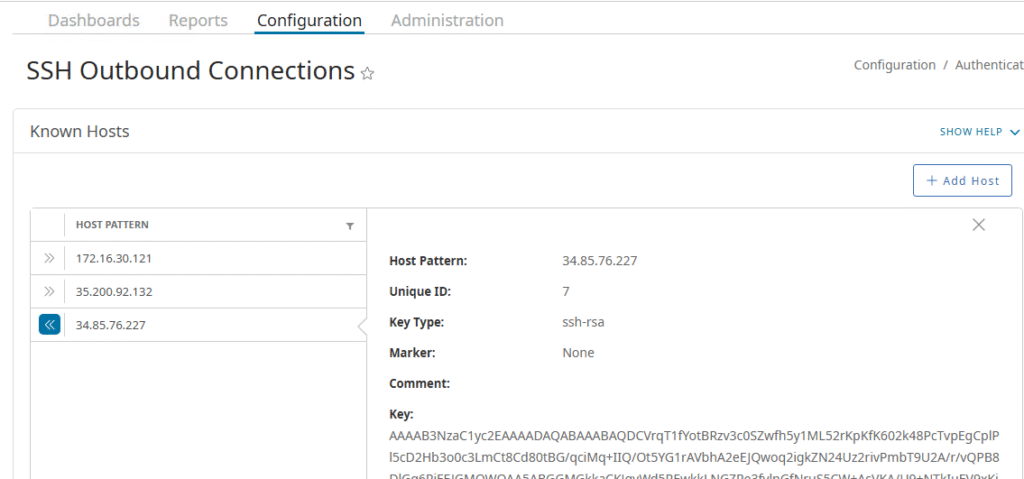
Step 3. Add Cloud SWG Host to Known Hosts
Add the host fingerprint for upload-<region>.threatpulse.com or it’s IP address.
Step 4. Configure Access Log Upload
- GUI: Access Logging → Edit log (
main) → Upload Client = SCP. - Settings: server =
upload-<region>.threatpulse.comor IP address, authentication =client-key cloudswg_scp, enable gzip. - In the SCP client configuration, you must enter the username provided by Cloud SWG (e.g.,
customerXXXXX). - The path field should remain empty — Cloud SWG will place the logs automatically in the correct directory.
- Specify the authentication-method as client-key.
access-log
  edit log main
    scp-client authentication-method client-key
Step 5. Test Upload
Use Upload Now. In the Event Log you should see:
- SSH: Authenticated to upload-…
- Access Log … Upload completed successfully.
Within 5–10 minutes, data should appear in Cloud SWG Hosted Reporting.
Scenario B: Upload via a Staging Server
Step 1. Prepare in the Cloud SWG Portal
Same as Scenario A: enable Hosted Reporting, download the private key, and note host and username.
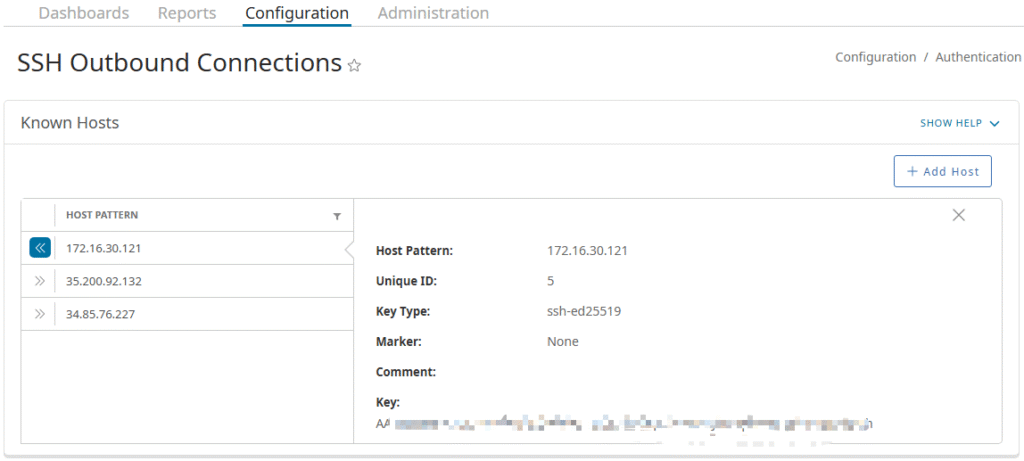
Step 2. Add Staging Server Host to Known Hosts
Add the host fingerprint for Staging Server IP address.
Step 3. Configure Edge SWG → Staging
- Add an Upload Client pointing to the Ubuntu server (FTP/SFTP/SCP).
- Directory =
/uploadlogs, authentication with a dedicated username(edgeupload)/password. - Enable gzip.
Step 4. Configure Ubuntu Staging → Cloud SWG
- Create a dedicated user:
sudo adduser edgeupload
sudo mkdir -p /home/edgeupload/uploadlogs
sudo chown edgeupload:edgeupload /home/edgeupload/uploadlogs
- Install OpenSSH:
sudo apt update
sudo apt install openssh-server -y
- Place the private key:
mkdir -p /home/edgeupload/.ssh
cp privateKey /home/edgeupload/.ssh/upload_threatpulse.key
chown -R edgeupload:edgeupload /home/edgeupload/.ssh
chmod 700 /home/edgeupload/.ssh
chmod 600 /home/edgeupload/.ssh/upload_threatpulse.key
- Test upload:
su - edgeupload
cd /home/edgeupload/uploadlogs
scp -i ~/.ssh/upload_threatpulse.key *.log.gz \
    customerXXXXX@upload.threatpulse.com:
Verification in Cloud SWG Reports
- Log in to the Cloud SWG Portal → Reports.
- Set Log Source = hosted (to only see Hosted Reporting logs).
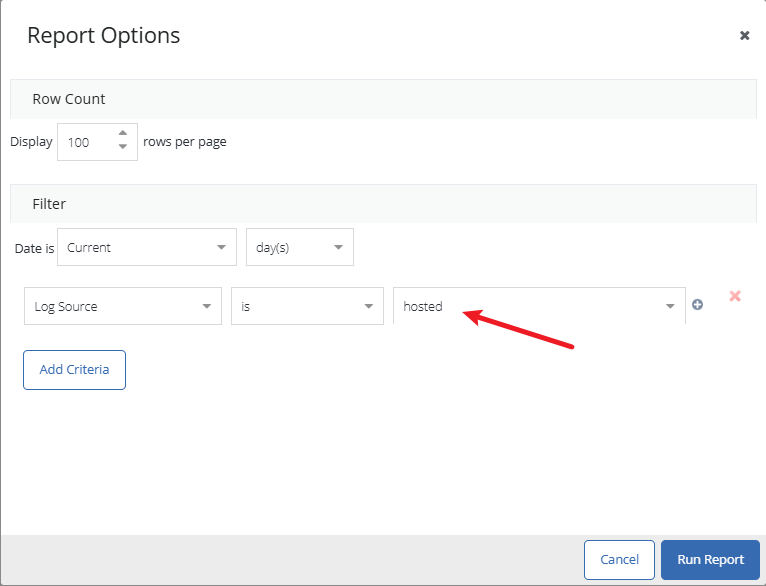
- Set Data Path = Cloud SWG.
- Run the report. Within 5–10 minutes, uploaded logs should appear.
Troubleshooting Notes
1. Private key permissions too open:
Permissions 0644 for 'privateKey' are too open.
This private key will be ignored.
Fix:
chmod 600 /home/edgeupload/.ssh/upload_threatpulse.key
chmod 700 /home/edgeupload/.ssh
2. KEX successful but authentication failed:
SSH: kex successful with peer ...
Permission denied (publickey,...)
This means the secure channel was established but authentication failed.
Root causes:
- The private key file contained extra spaces, blank lines, or hidden characters when pasted.
- The key was not in the correct PEM format.
Fix:
- Re-download the PEM private key from the Cloud SWG portal.
- Carefully check the file to ensure there are no extra spaces, empty lines, or non-printable characters.
3. Upload Now shows “% Access Log : Nothing to upload. Try again later.”
Fix:
- This usually means that no access logs have been generated yet.
- Try browsing some websites to generate traffic and trigger log entries.
- You can verify whether logs are being created under Reports → Access Logging in the Edge SWG management console. Make sure you select the correct log name.
- Also ensure that Enable Access Logging is turned on and the Default Logging Policy is properly configured.
Recent Comments